Generate Schedule-Based Fees
This article will describe the process for generating schedule-based fees. Schedule-based fees are any fees that are calculated using a set schedule. A schedule can be based on the number of classes in which a student is enrolled or the number of hours each week or month for those classes. The schedule can be expressed on a per student basis or a per account basis (combining the students on an account).
A simple example of a class count-based schedule would be something like this:
for 1 class, $100/month
for 2 classes, $125/month
for 3+ classes, $150/month
A simple example of an hour-based schedule would be something like this:
for 1-1.5 hrs/week, $100/month
for 2-3 hrs/week, $125/month
for 3+ hrs/week, $150/month
To learn more about fee generation in Main Street Sites, please see the Fee Generation Overview.
To generate fees using a schedule, go to Manage > Generate Fees > Schedule-based Fees:

Set up your classes for periodic fee generation
Before you can generate fees, you'll need to indicate which of your classes should participate in fee generation and what the tuition is for each class. See How to set fee generation settings for classes for information on how to do this. In addition to simply enabling your classes for fee generation, you'll need to indicate how much time should be allocated to each class if you are using an hour-based schedule.
Over time, when you create additional semesters, use the "Roll forward" or "Copy Classes" features to bring these settings into your new semester classes.
You'll notice at the top of the schedule-based fee generation page that a count is shown of classes that are ready to generate fees.
Step 1: Select the accounts, enrollments and schedule options to be used for fee generation
The first step of schedule-based fee generation lets you pick the semester, classes and accounts for which you wish to generate fees. In many cases, you may find you just need to pick the semester. The class and account options are for situations where you want to target particular groups of classes or accounts for generated fees. This is done in cases where different groups of accounts or classes need to be handled differently.

At the bottom of the page, you'll indicate what kind of schedule you'd like to use. You can select a saved schedule or create a new schedule on the next page.
Advanced Options
The advanced options on this page support certain special cases. Although fees will only be generated for the classes indicated above, you can have the rate for those classes determined by looking at classes in additional semesters. Similarly, if you are using the filters above to generate fees only for certain classes, you can indicate whether or not the filters should be ignored when calculating the rate in the fee schedule.

For example, assume a schedule is being used to calculate fees using this schedule:
for 1 class, $100/month
for 2 classes, $125/month
for 3+ classes, $150/month
If you decide to generate fees for a single class, like "beginner ballet," by default enrollments for all classes in the semester will be considered when using the schedule to calculate the appropriate fees. This is typically the desired behavior. However, you can click on the "Apply class filters when calculating total hours or classes" and only the enrollments for "beginner ballet" will be considered when calculating the fees.
Step 2: Enter the schedule options you'd like to use
On the first page, you can select how you'd like to define your fee schedule, as shown here:

A class-count based schedule will look something like this:

An hour-based schedule will look like this:

In each case, you are simply entering a schedule to be used to calculate the fees. If you need to add additional rows, click on "add more rows" as needed. To save your schedule to use again later, click on "Save Plan As..."
Note: The process for entering account-based schedules is the same as what is shown above. The only difference is how the schedules are then used to generate fees. A "by student" schedule will be applied to one student at a time. A "by account" schedule will be applied to all of the students for a given account.
Step 3: Enter specific values for the fees to be generated

Here you will indicate the details of the fees being generated other than the amount. In most cases, you will just set the "Type" to an appropriate value. If you don't have a suitable type in the list, you may need to add one at Setup > Advanced > Fee Types. The "Line Item Note" is a note that will appear on customer statements. The "Note" field is an internal note.
Advanced Settings
The "Show Advanced Settings..." option allows you to select some non-standard options for your fees. In most cases, you will not need to use this feature.
The "Enrollment Status," "Account Status" and "Class Status" settings let you include enrollments, accounts and classes that would typically be ignored. Unless these special settings are used, only active accounts, enrollments and classes are used for fee generation.

Step 4: Review your settings and click "Preview Generated Fees" when ready
This step gives you a chance to confirm that you have picked the right settings for your fees. Click on the "Preview..." button when you are ready to create the fees.

Note: The generated fees will not be posted to customer accounts until you have had a chance to look them over in the final step.
Step 5: Generating Fees
You'll see a progress indicator while the fees are generated. This usually takes a few seconds, but could take a minute or two depending on the current level of system activity.

Step 6: Review and post your fees
Once your fees have been generated, you'll see them in a list like the one shown below. If you see any issues with the fees, you can click on the "Back" button to change your settings and try again. Once you are satisfied that the fees are correct, you can click on "Post Selected Fees" to save the fees to your customer accounts. Note that you can also uncheck any fees in the list if you don't want them to be saved.
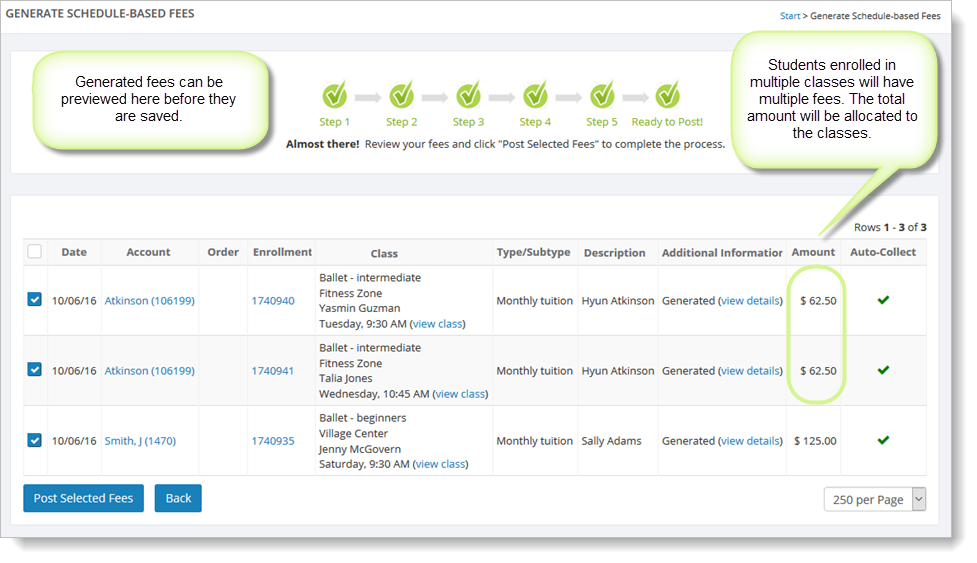
Note: Although the schedule you have specified will have indicated a lump sum to charge for a certain number of class hours or classes, a single fee is still generated for each enrollment. You can see this highlighted in the example shown above. This is done to maintain a connection between the amounts being billed and the classes in which the students are enrolled. The total amount for the account or student is allocated to the individual enrollments. For hour-based schedules, the allocation is done based on the duration of the class relative to the total. For class count-based schedules, the amounts are allocated evenly to each class.
When you are ready, click on "Post Selected Fees." You'll see a progress indicator like the one shown below while the fees are being posted to your customers' accounts:

Finally, you'll see a summary with a total of the fees posted:

Click on the "Click here to view generated fees" link to see the fees in the Manage > Financials > Fees & Credits page. You can delete or edit the fees from there if needed.