How to enter user query data
A user query is a customized report that you create. Not only can you specify exactly what type of information you want and how you want it sorted, you can also export the query results in different formats and print it.
This help topic explains how to specify exactly what query data you want to include in the results. The following four sections of the Run Query page are explained:
Name and query type
When you select the "Add" button on the Saved Queries page, the first section of the page looks like this:
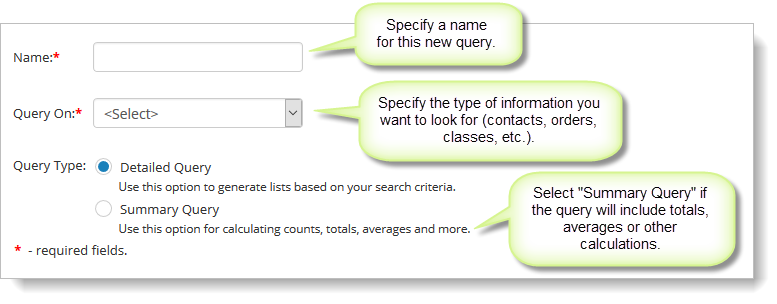
Note: If you are running a new query, the field for specifying a query name isn't available until you decide to save the query.
The "Query Type" you select depends on what kind of report you want to run. A "Detailed Summary" is a report that does not include totals, averages, or other calculations. A simple example of a Detailed Query is generating a list of accounts with children in a certain date range.
If you want to include any calculations in your report, such as totals or averages, make sure you select the "Summary Query" option for "Query Type." An example of a Summary Query is generating payment allocations totals for each of your locations.
Field selection
Once you have specified what kind of information you want to query in the "Query On" field (above), you can select the fields to include in the report.
In the "Field Selection" section, click on the "Add" button and select the "Add Multiple Fields" command.
Keep in mind that in the query results, these fields will display as
columns that are listed from left to right on the screen. If you select a large number of fields here, all of the
columns may not fit on the screen, and you will have to export the query
results as CSV or Excel to view all of the columns.
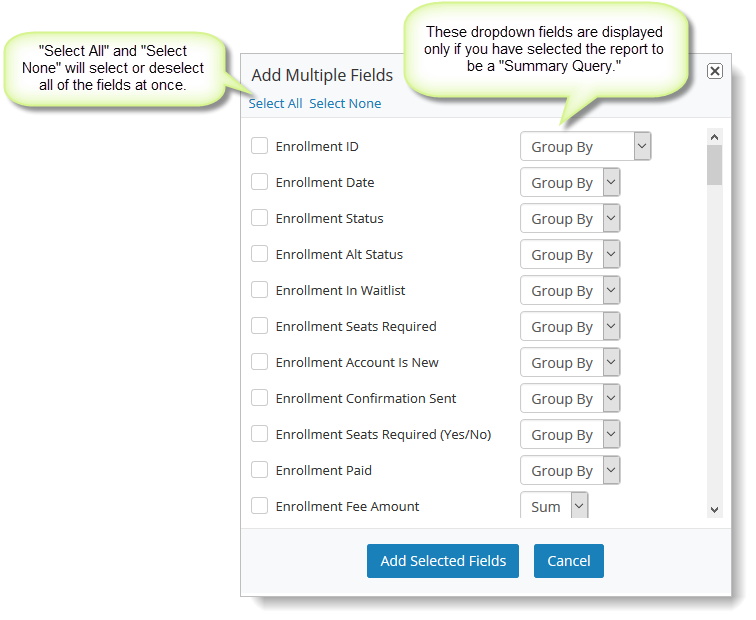
If you selected "Summary Query" in the previous section, the popup shown above displays a column that can apply additional actions to a field:
- Group By—No action will be performed on the field.
- Sum—Returns the sum of all the values for the field.
- Min/Max/Avg—Returns the minimum, maximum or average value for the field.
- Count—The values for the selected field are counted, including any duplicates.
- Count Distinct—Returns the number of unique values in a field. Does not count any duplicate values.
Note: These dropdown fields are also added to the field list on the page in the "Operations" column, allowing you to change them there as well.
After you select fields and click the "Add Selected Fields," you will see them displayed in a grid on the query page.
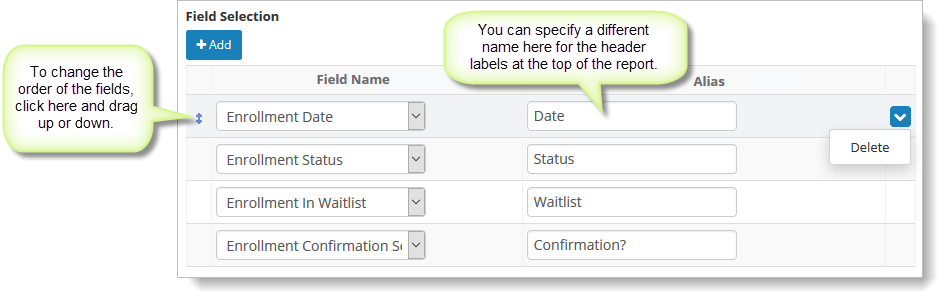
To change the order in which the fields/columns display from left to right, click on a row and drag it up or down.
To change the field name that will display on the query results page, you can enter an alternate name in the "Alias" column.
To delete a field/column from the list, hover over it, and click on the far right blue down arrow. Select the "Delete" button.
If you forget to add a field, you can select the "Add" button, and select the "Add Field" command.
Filters and conditions
After you have selected the fields that will display on the query results, you can define additional criteria for including them in the query. To do this, you will create filters and conditions.
By default, a new query always includes a filter named "Filter group
#1." You can edit this filter by clicking on the "change" button.
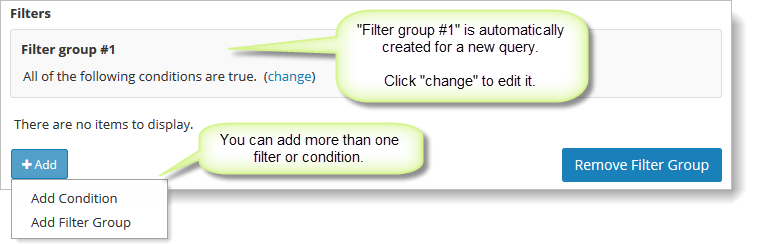
When you click "change" for Filter group #1, you will see the following popup:
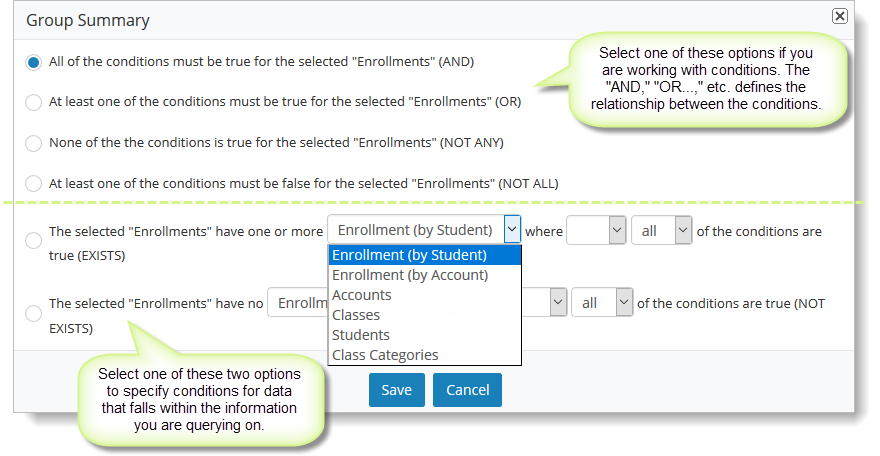
If you select one of the first four options, you can specify conditions by selecting "Add" and choosing "Add Condition." You will see a popup similar to this:
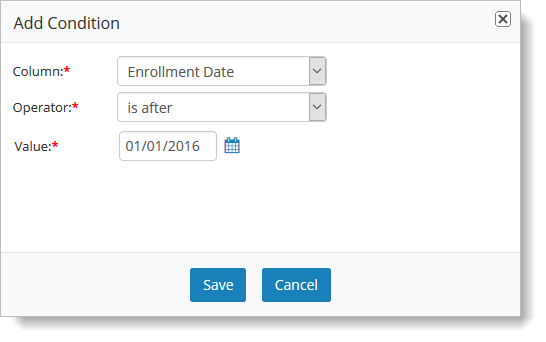
In the "Column" field, select the field for which you want to specify a condition. Next, the "Operator" field defines how the field value should be evaluated (for example, "less than" or "equal to"). After you select an option in the "Operator" field, you will see a new field, "Value." What you enter/select here works with the value you selected for "Operator."
If you want to specify additional criteria on a different type of data, you should create another filter group. Select "Add" and choose "Add Filter Group." You can also specify conditions for this filter group. You can specify as many filter groups as necessary.
Sort
The "Sort" section of the page allows you to sort the query results if you'd like. For example, you can sort a list of account names sorted alphabetically, by the account's town name, and so forth.
Note: Select the "Desc" option for a field if you want it to be sorted in descending (as opposed to ascending) order.
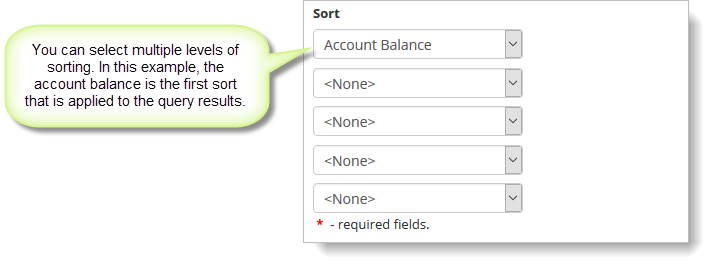
Note: If you are running a Summary Query, the sort fields are not labeled with a field name, but are identified as "Selected Field 1," "Selected Field 2," etc. "Selected Field 1" is the leftmost field in the "Field Selection" section, "Selected Field 2" is the second field from the left, etc.
To run the query, select either "Save & Run" or "Run (w/out saving)."

- Save—Saves the new report and the current page remains open.
- Save & Return—Saves the new report, closes the page and returns to the user query grid.
- Save & Run—Saves the new report and runs it.
- Run (without saving)—Runs the report without saving it.
- Cancel—Closes the page without saving the report.