Generate Periodic Fees
This article will describe the process for generating periodic fees. Periodic fees are fees that are posted to customer accounts on a routine basis (typically monthly). To learn more about fee generation in Main Street Sites, please see the Fee Generation Overview.
The periodic fee generator looks at the set of active customer enrollments and creates fees based on those enrollments. Each class can have its own periodic tuition amount associated with it. For each student enrolled in that class, the periodic fee generator will post a fee for that amount.
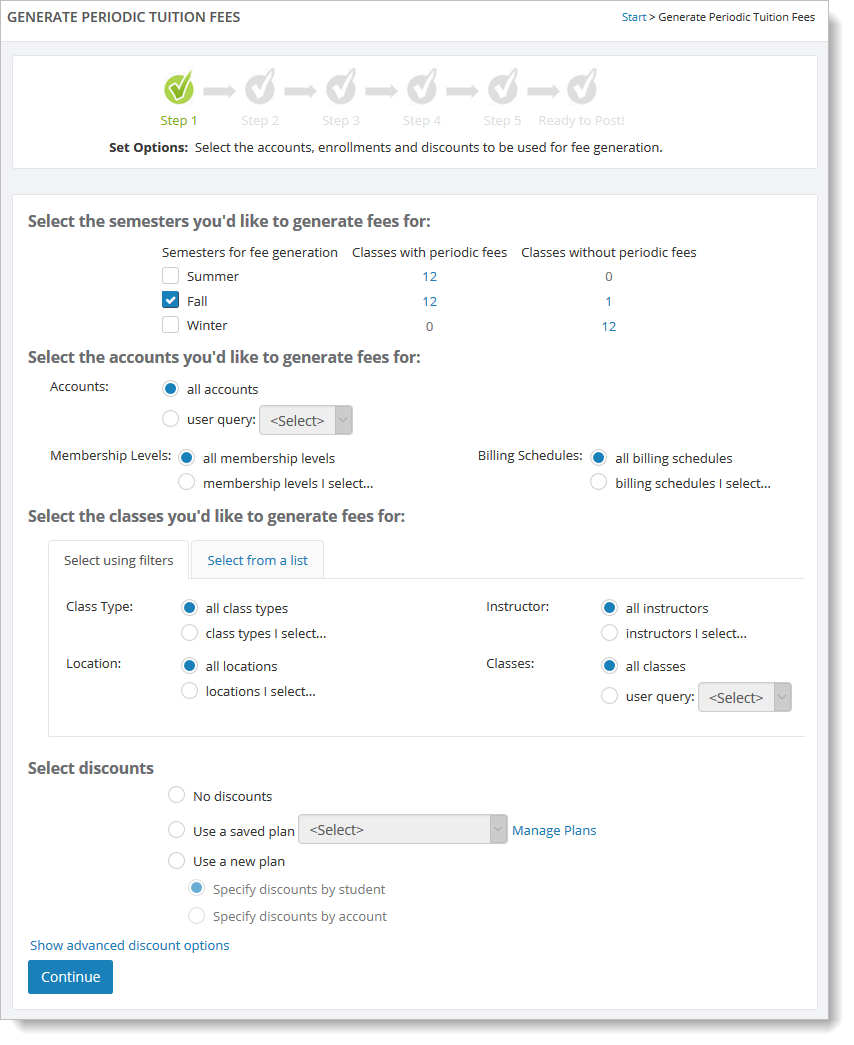
The periodic fee generator can be found at Manage > Generate Fees > Periodic Tuition Fees:
Set up your classes for periodic fee generation
Before you can generate fees, you'll need to indicate which of your classes should participate in fee generation and what the tuition is for each class. See How to set fee generation settings for classes for information on how to do this.
Over time, when you create a additional semesters, use the "Roll forward" or "Copy Classes" features to bring these settings into your new semester classes.
You'll notice at the top of the Generate Periodic Tuition Fees page that a count is shown of classes that are ready to generate fees.
Step 1: Select the accounts, enrollments and discounts to be used for fee generation
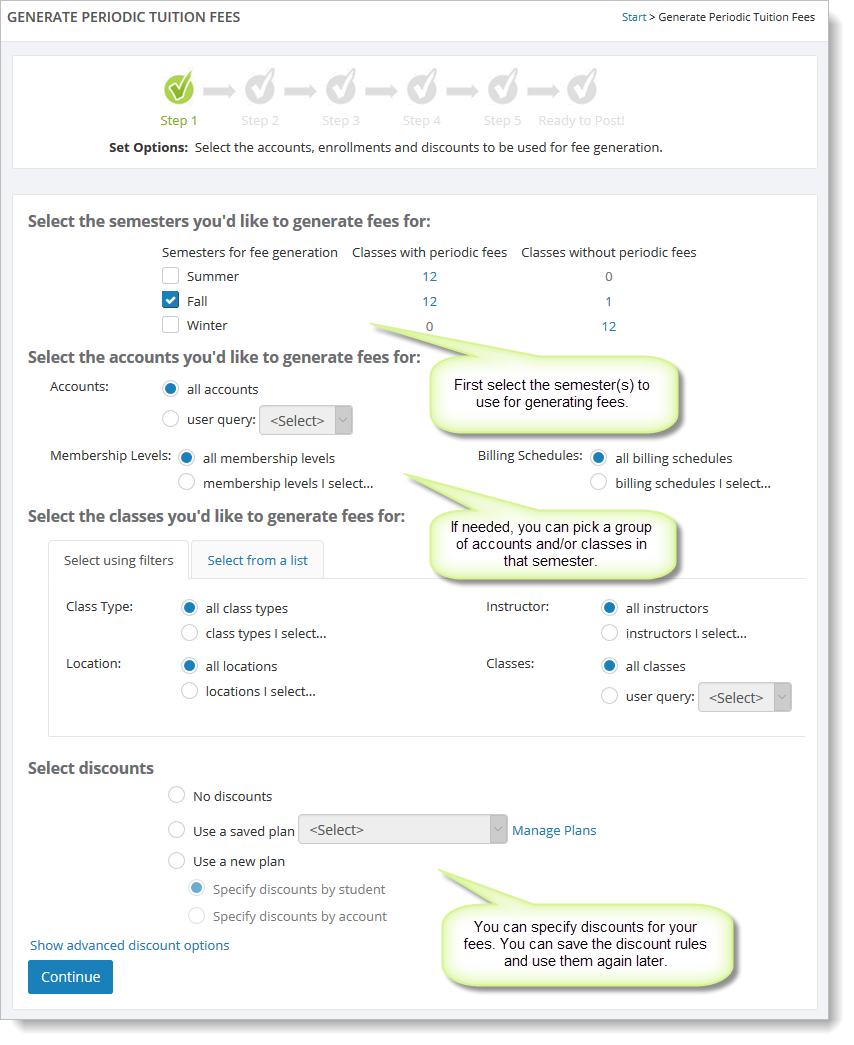
The first step of periodic fee generation lets you pick the semester, classes, accounts and discounts for the fees you plan to generate.
In most cases, you would select your current semester and generate fees for all students enrolled in classes in that semester. In the example below, the semester "Summer" is selected, and fees will be generated for all students in those classes.
Selecting accounts
If you wanted to generate fees for a specific set of accounts, you can specify a list of accounts using a user query, one or more membership groups of billing schedules. Some examples of this would be:
-
Some accounts receive special discounts (if the students are part of a performance team, for example). Those accounts could be placed into a special membership group and fees are generated separately for them.
-
Some accounts may be billed monthly and others pay quarterly. These accounts could be assigned to different billing schedules. Each month, fees could be generated for the accounts in the "Monthly" billing schedule and each quarter for the "Quarterly" billing schedule.
-
Some accounts might pay in advance and not participate in fee generation at all. In that case, the accounts that do not pay in advance might be assigned to a particular membership group. Fees would only be generated for the accounts in the designated group.
Selecting classes
If you wish to generate fees for a particular set of classes, you can do so by any combination of location, class type or teacher. You can select classes from a list as well. You can also specify a user query to identify the classes if you wish.
This option can be used to support cases where fees or discounts vary by location or teacher. It can also be used in cases where some classes generate their fees on a different schedule than other classes.
If you simply wanted certain classes in a semeseter not to generate any fees, you would not enable periodic fee generation for those classes in Manage > Classes > Classes (Additional Info tab).
Specifying Discounts
You can generate fees with no discounts, use a saved discount plan or specify discounts manually in the next step. Because discounts are a detailed topic, they will be addressed in their own section at the end of this article. For now, we will assume that the "No discounts" option has been selected.
Note: When the "No discounts" option is selected, the number of steps at the top of the page is reduced by one.
Step 2: Enter specific values for the fees to be generated
For the next step, you will need to indicate the type for the fees being generated. You may need to go to Setup > Advanced > Fee Types and add additional fees types if you haven't already done so.
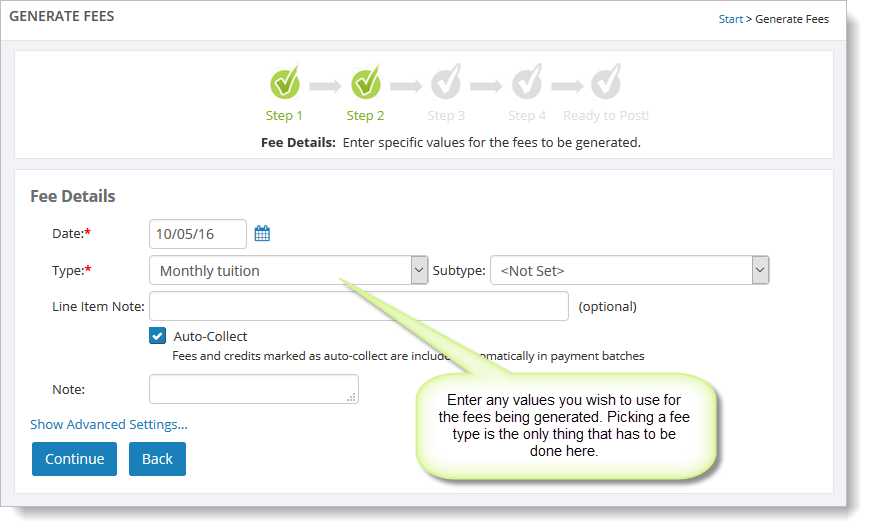
You can indicate a line item note for the fees (this is a customer-facing note that shows up on account statements) and an internal note.
Advanced Settings
Advanced settings exist to support special cases. In most cases, you will not need to use these advanced settings for your generated fees.
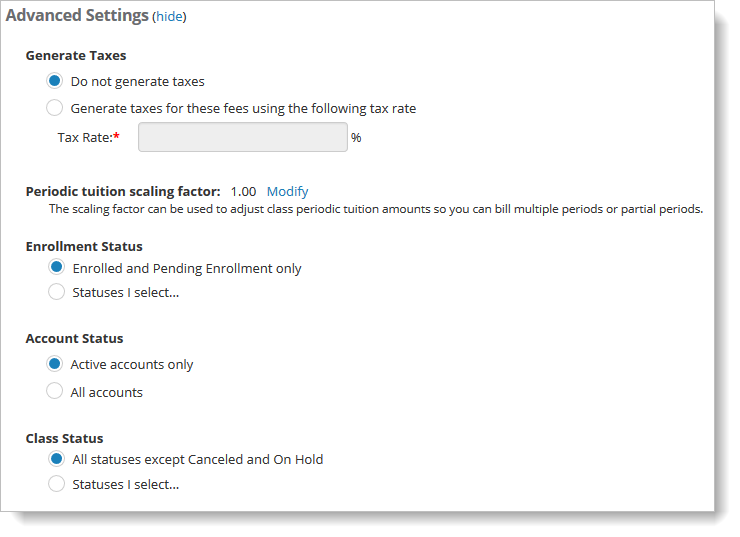
The "Generate Taxes" setting, if used, adds the specified tax percentage to the generated fee.
The "Periodic tuition scaling factor" allows you to scale your fees up or down by any factor. This can be useful if you specify your fees using one period, but generate them using a different period. For example, you define your periodic tuitions using a monthly amount, but generate the actual fees quarterly. In that case, you would specify a scaling factor of 3.
The "Enrollment Status", "Account Status" and "Class Status" settings let you include enrollments, accounts and classes that would typically be ignored. Unless these special settings are used, only active accounts, enrollments and classes are used for fee generation.
Step 3: Confirm your Settings
This page lets you review the settings for this fee generation batch.
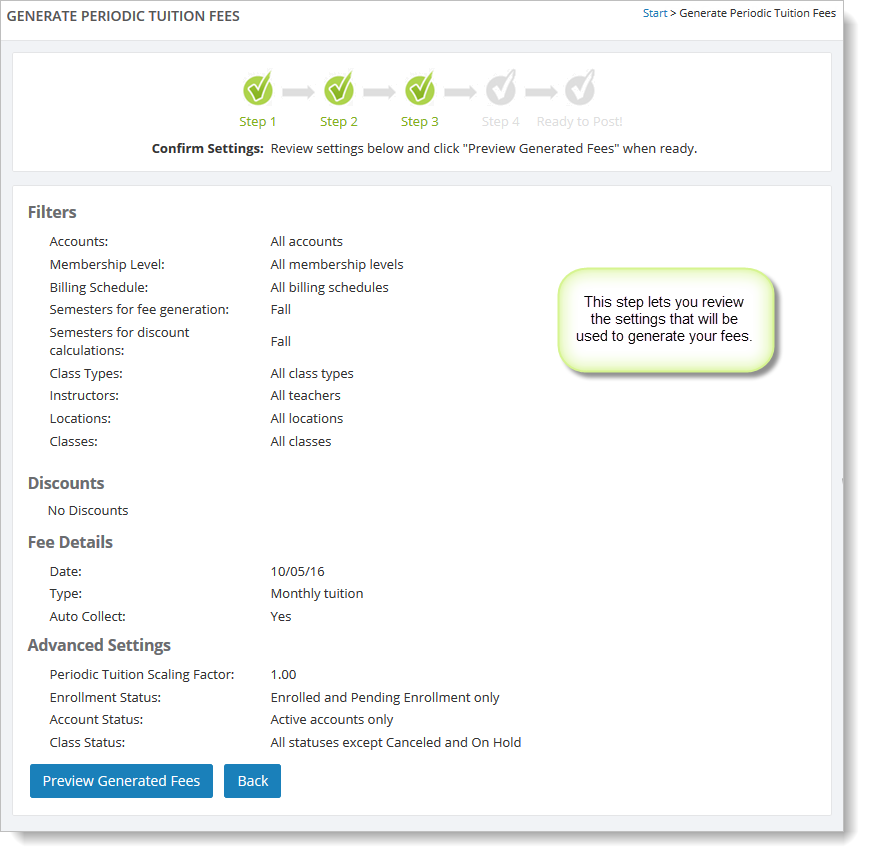
Click on "Preview Generated Fees" to start creating your fees. The fees will not be posted to customer accounts until you have reviewed them in the next step.
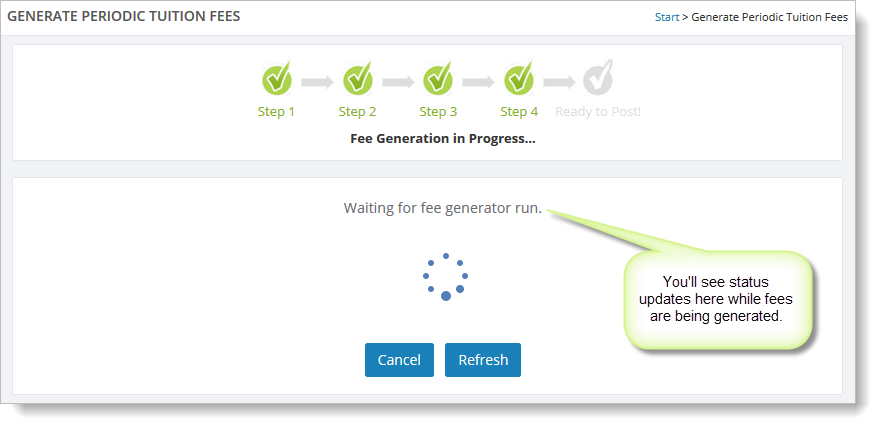
Step 4: Generating the fees
While your fees are being generated, you'll see the progress indicated like the one shown here:
Step 5: Review and post your fees
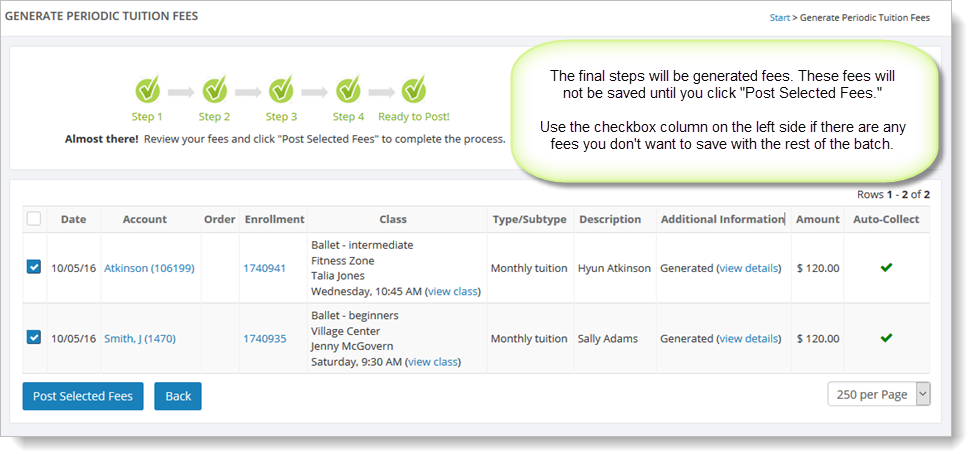
Once your fees have been generated, you'll see them in a list like the one shown below. If you see any issues with the fees, you can click on the "Back" button to change your settings and try again. Once you are satisfied that the fees are correct, you can click on "Post Selected Fees" to save the fees to your customer accounts. Note that you can also uncheck any fees in the list if you don't want them to be saved.
Saving your new fees may take a few seconds. You'll see a progress indicator like this until the fees are fully posted:

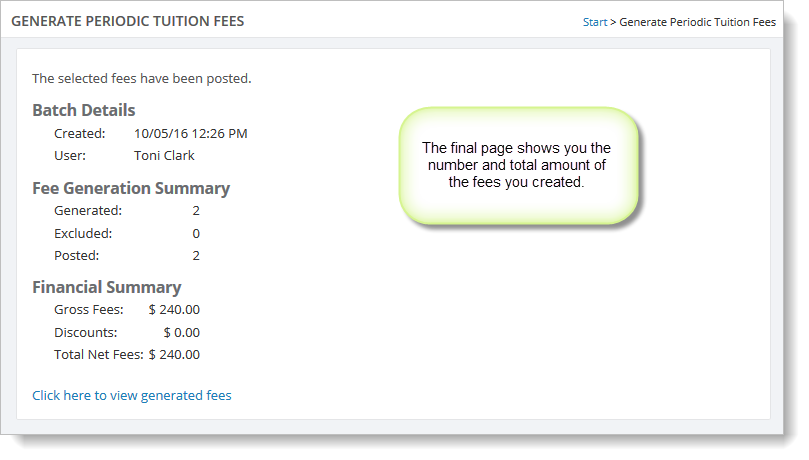
Finally, you'll see a summary of the fees that you just created. You can use the "Click here to view generated fees" link to access these fees on the Manage > Financials > Fees & Credits page. If you need to delete the fees for any reason, just click on this link, select the fees in the list and use the "Delete Selected Fees" option on that page.
Generating Periodic Fees using Discounts
Periodic fee generation includes a full set of options for incorporating discounts while fees are being generated. If you will be using discounts, the first decision to make is whether discounts will be defined at the student level or the account level. The two options are discussed separately below.
Note: You'll have the chance to save your discounting rules and use them again in the future. Once you have saved at least one set of discounting rules, you'll see the "Use a saved plan" option shown below.

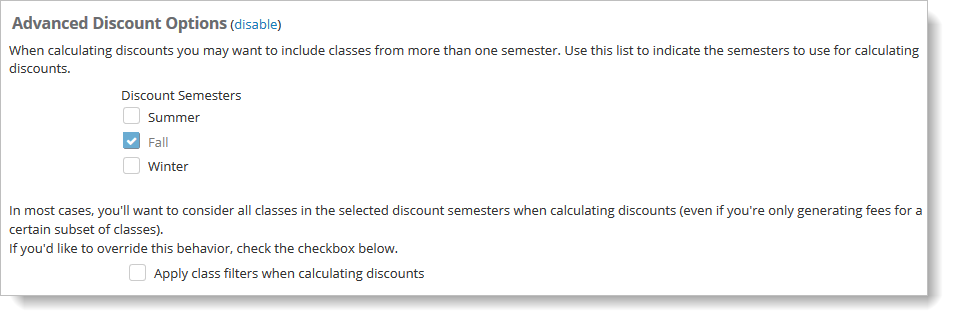
Advanced Discount Options
Most customers should be able to ignore the advanced discount options. Discount rules can take into account the number of classes or class hours a student is taking. In most cases, the classes to be considered for these discounts should be the same set of classes for which fees are being generated. However, this is not always the case.
If you want to include classes in additional semesters when discounts are calculated, you can select them here.
Similarly, if you are only generating fees for a subset of classes within a given semester, you can indicate if other classes in the semester should be considered when calculating discounts. By default, all classes in the semester are considered when calculating discounts.
Specifying Discounts by Student
If you select "Specify discounts by student" in Step 1 of periodic fee generation, you see the following page as your next step:
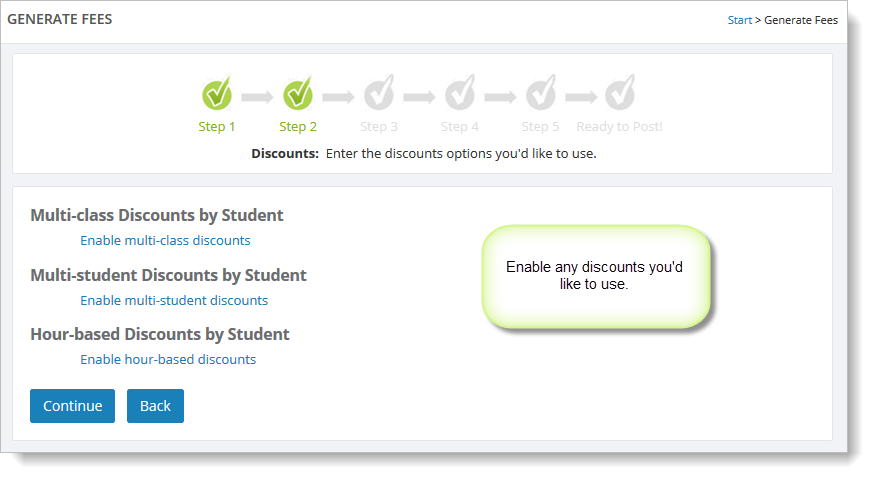
On this page you can pick which kind of student-level discounts you wish to use.
Multi-class Discounts by Student
In this case, you will specify how a student's tuition should be discounted for the first, second, third, etc. class that he or she is enrolled in. Discounts can be specified as percentages or flat amounts.
Note that the first option here is how the enrollments should be sorted before the discounts are applied (lowest to highest or highest to lowest).
If the "5th discount" field is used, the discount will be applied to the fifth class and beyond for a given student (if any).
The final option here is whether or not all tuitions for a given student should use the best available discount. By default, each class gets the discount assigned to it (the first class gets the first discount, second class gets the second discount, etc.). This option lets you assign the highest achieved discount to all enrollments for that student.
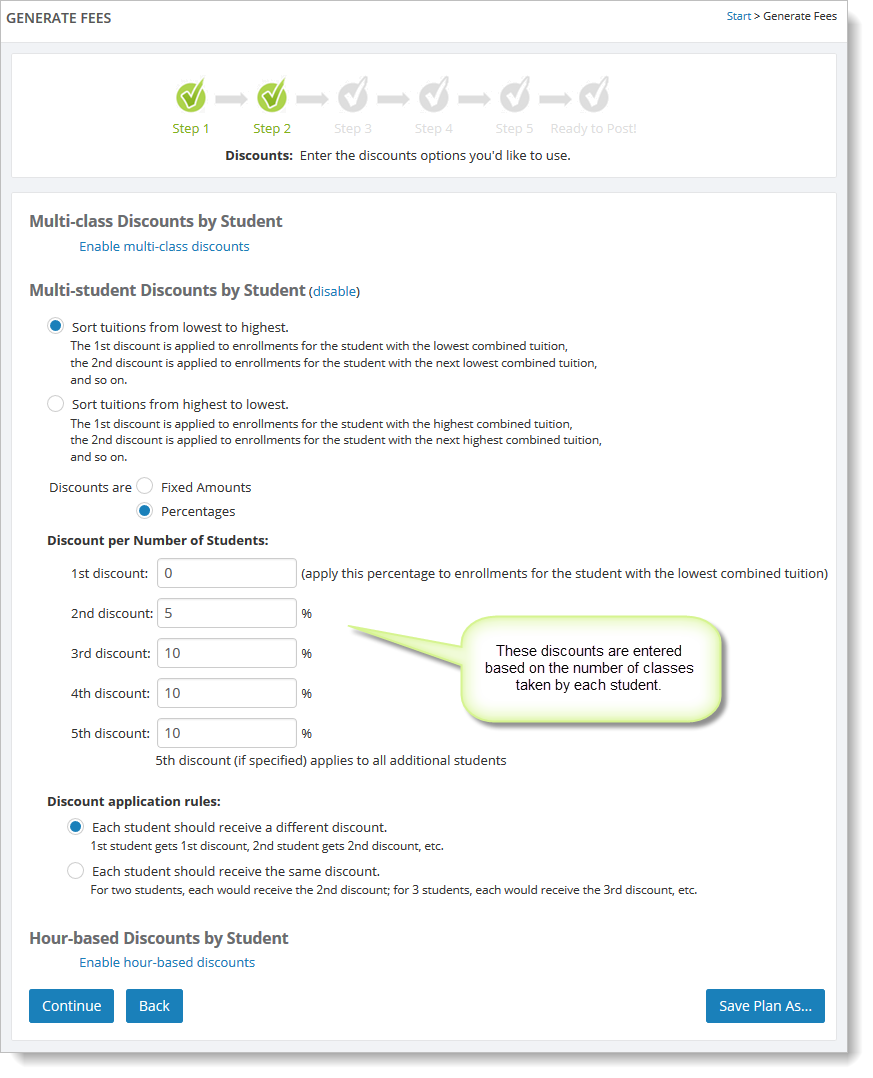
Multi-student Discounts by Student
This option lets you assign discounts based on the number of enrolled students in a given account. As with the discounts by class, you can indicate how the students should be sorted before discounts are applied. Discounts can be percentage-based or a fixed amount.
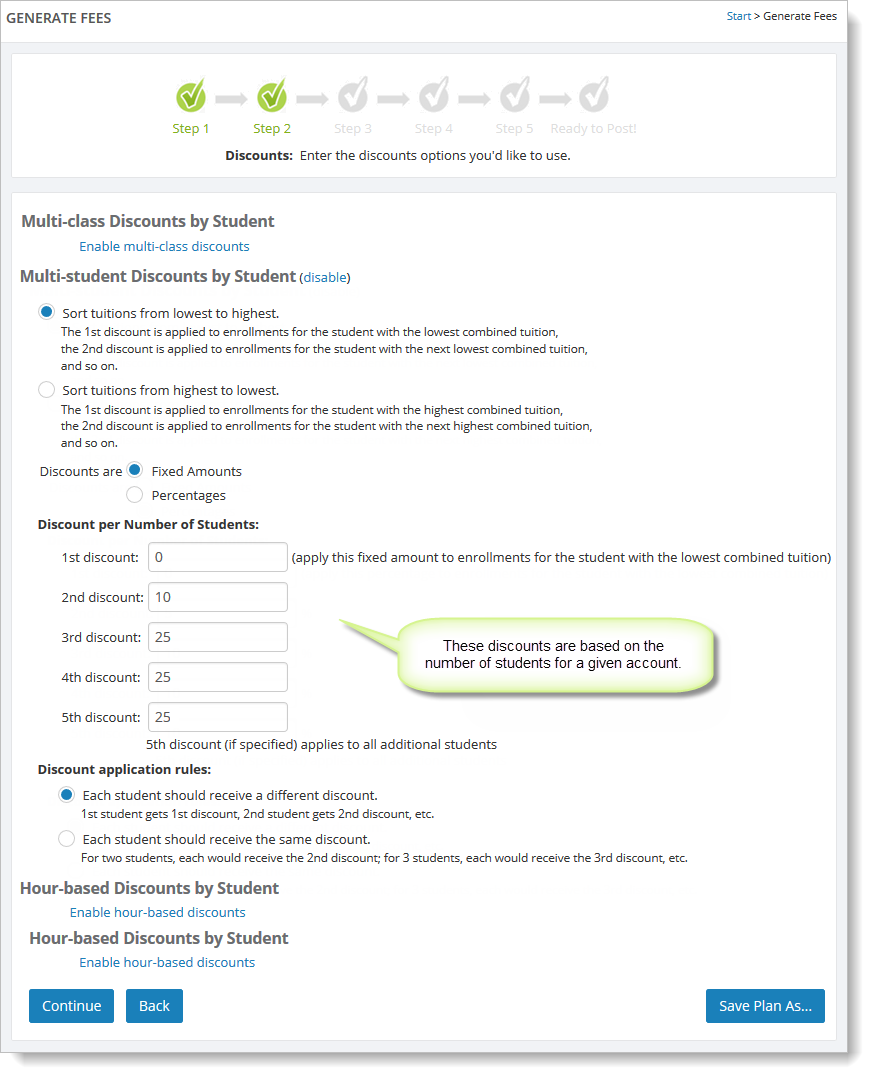
If the "5th discount" field is used, the discount will be applied to students five and above in a given account (if any).
The final option here is whether or not all tuitions for a given student should use the best available discount. By default, each class gets the discount assigned to it (the first class gets the first discount, second class gets the second discount, etc.). This option lets you assign the highest achieved discount to all enrollments for that student.
Hour-based Discounts by Student
Discounts for students can be specified based on class hours for the student. In this case, you will need to assign the number of class hours for your classes (1 hour, 1/2 hour, etc.). See How to set fee generation settings for classes for information on how to do this. Any class with no hours value assigned will be ignored by this feature.
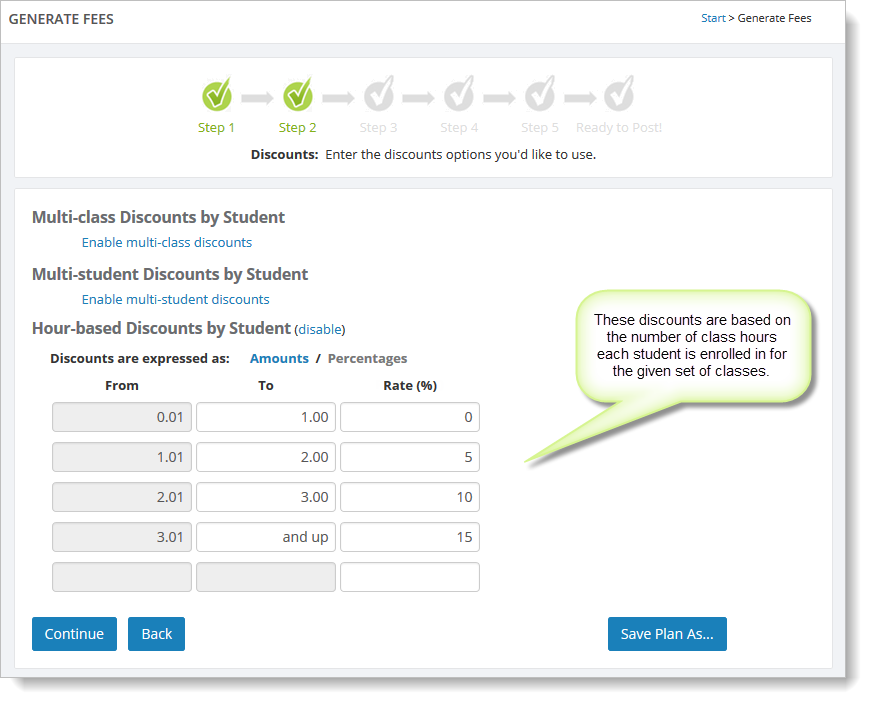
In this case, discounts are expressed as a schedule of values. The discounts can be either percentage-based or fixed amount. Enter your discounts into the schedule as needed. A simple example is shown above.
Generating Periodic Fees using Discounts by Account
If you select "Specify discounts by account" in step 1 of periodic fee generation, you see the following page as your next step:
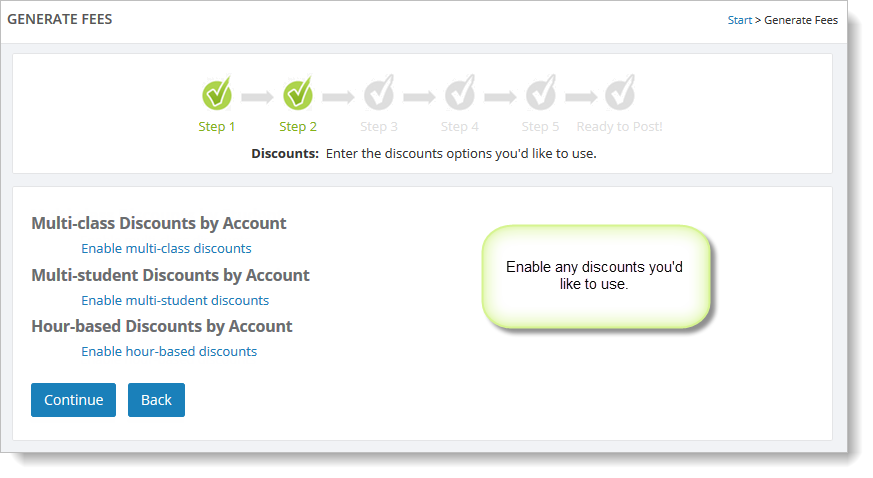
From here you can enable whichever kind of discount you'd like to use (or any combination thereof).
Multi-class Discounts by Account
If you enable multi-class discounts by account, you'll be able to specify discounts based on the number of total enrolled classes for each customer account.
You can indicate how these enrollments should be sorted (from lowest total tuition to highest total tuition or vice versa) and whether the discounts should be fixed amounts or percentages.
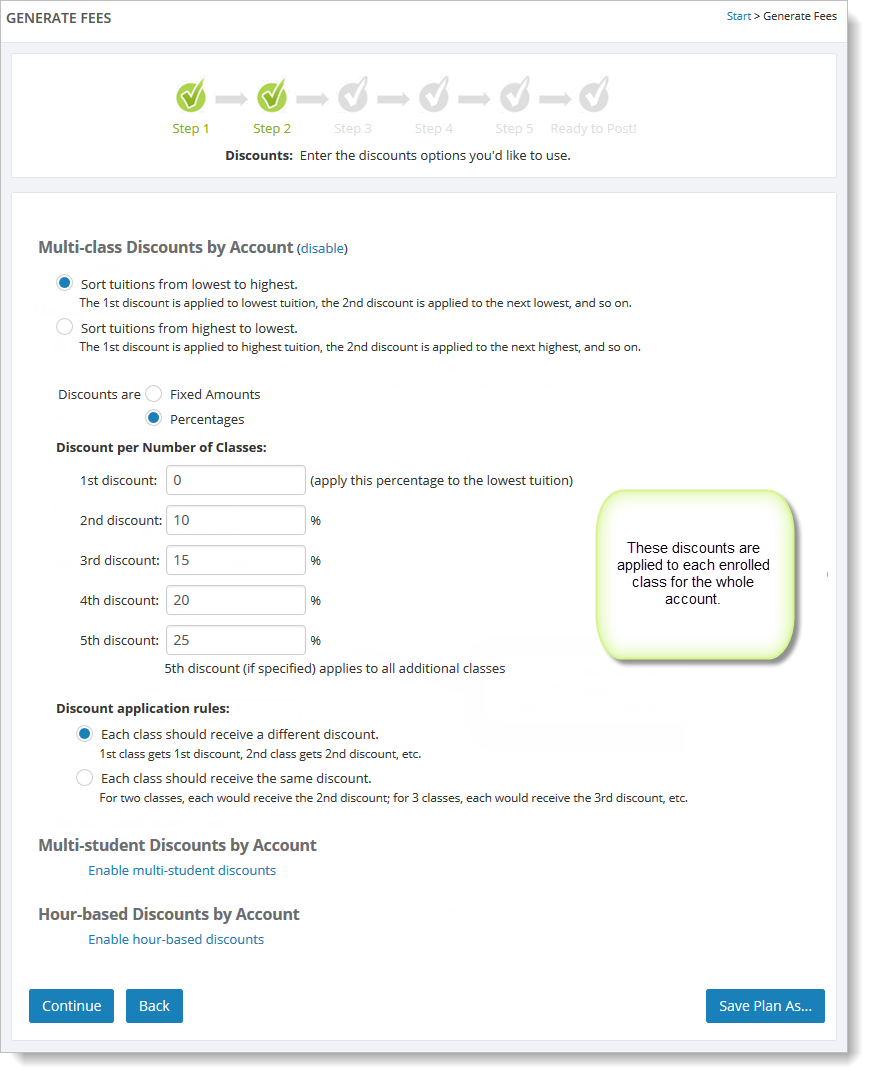
You can also indicate whether each class for the account should receive the same discount (based on the highest discount level for the account) or if each class should have a different discount.
Multi-student Discounts by Account
Select "Multi-student Discounts by Account" to specify discounts based on the number of students in the account.
Indicate how students in the account should be sorted (lowest total tuition to highest total tuition or vice versa). The discounts can be fixed amounts or percentages.
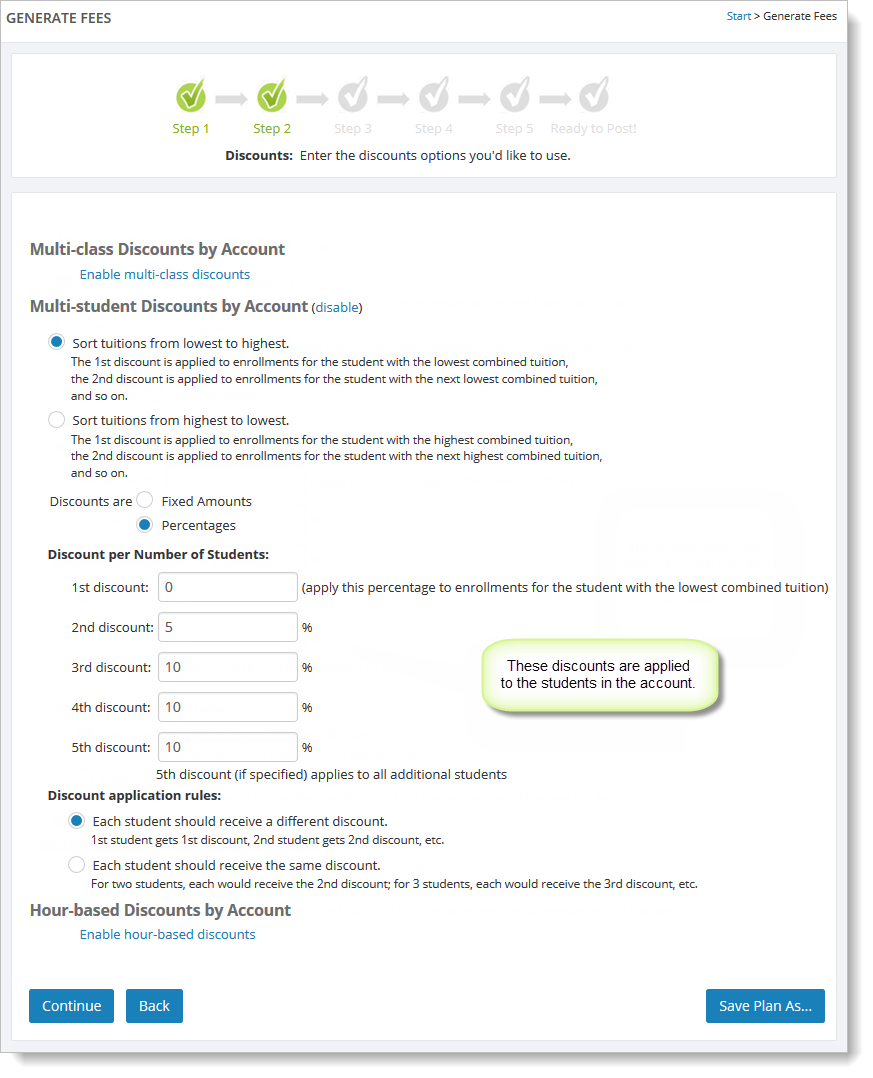
You can indicate whether or not each student should receive the highest discount achieved or each student should receive a different discount.
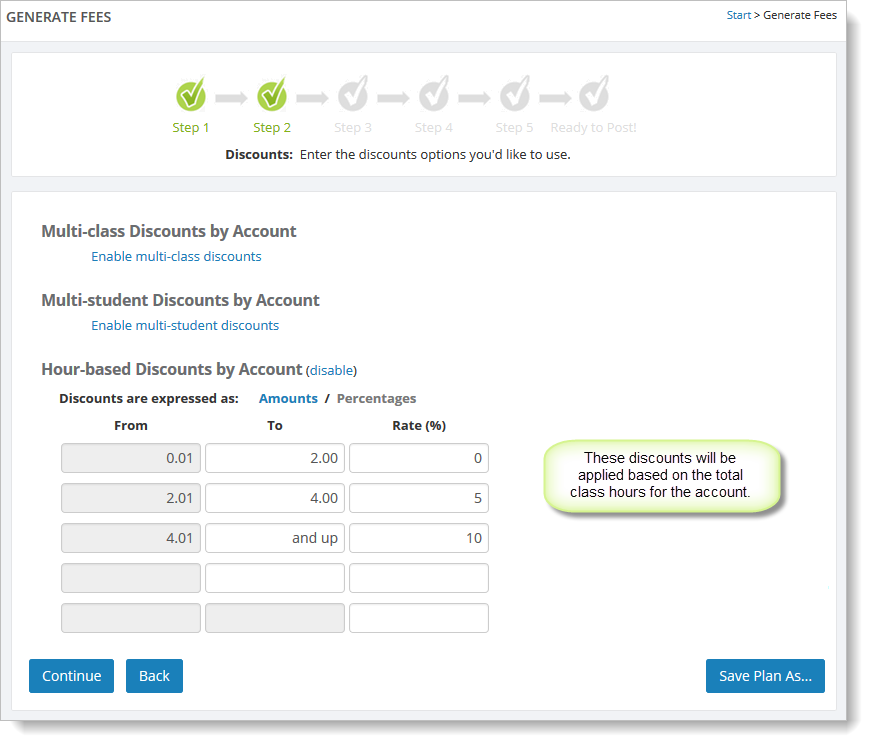
Hour-based Discounts by Account
Select "Hour-based Discounts by Account" to calculate discounts based on the total number of class hours in the account. In this case, you will need to assign the number of class hours for your classes (1 hour, 1/2 hour, etc.). See How to set fee generation settings for classes for information on how to do this. Any class with no hours value assigned will be ignored by this feature.
An Example of Discounts in Generated Fees
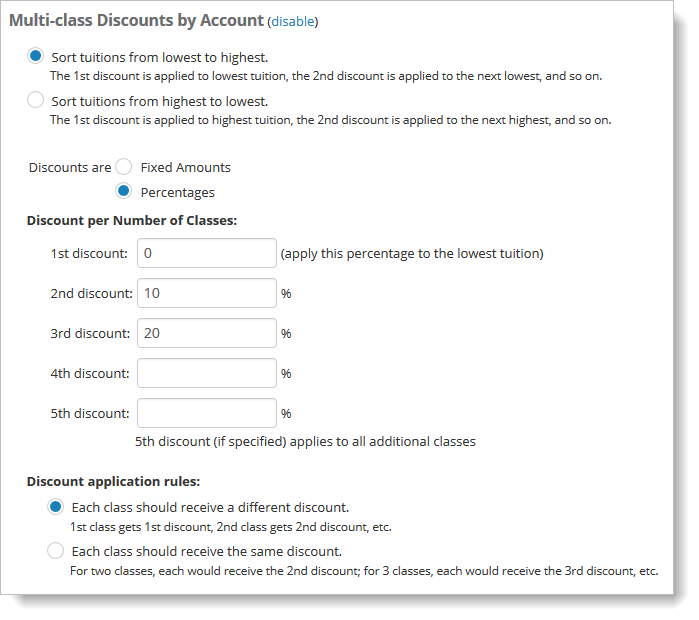
Here is a simple example of using discounts with generated fees. On the discount step, we define a 10% discount for the second enrolled class in an account and 20% discount for the third enrolled class:
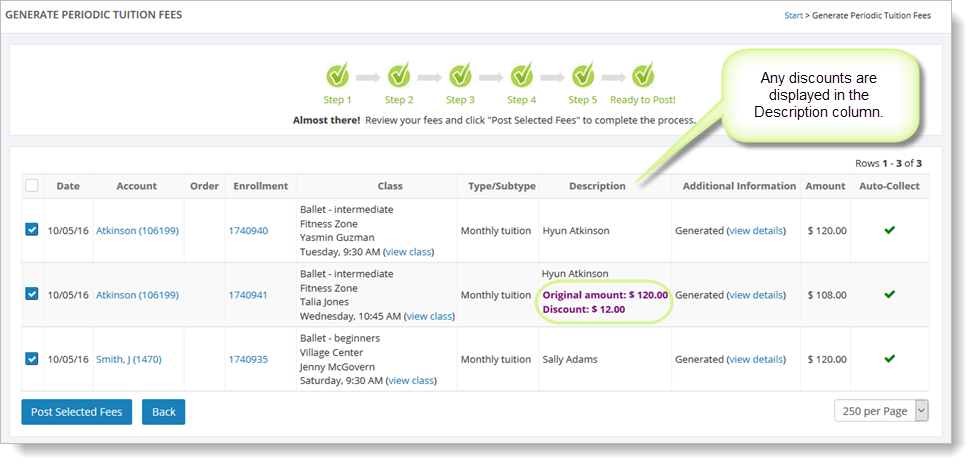
On the preview page, we see that a discount was applied to one of the fees. The original amount and the discount amount are shown in the Description column. The net amount is shown in the Amount column.
After the fees have been posted, you can view the batch by going to Manage > Financials > Fees & Credits. In the filters section, you can click on "more filters" to access the "Batch" filter. The discounts are shown here as well.
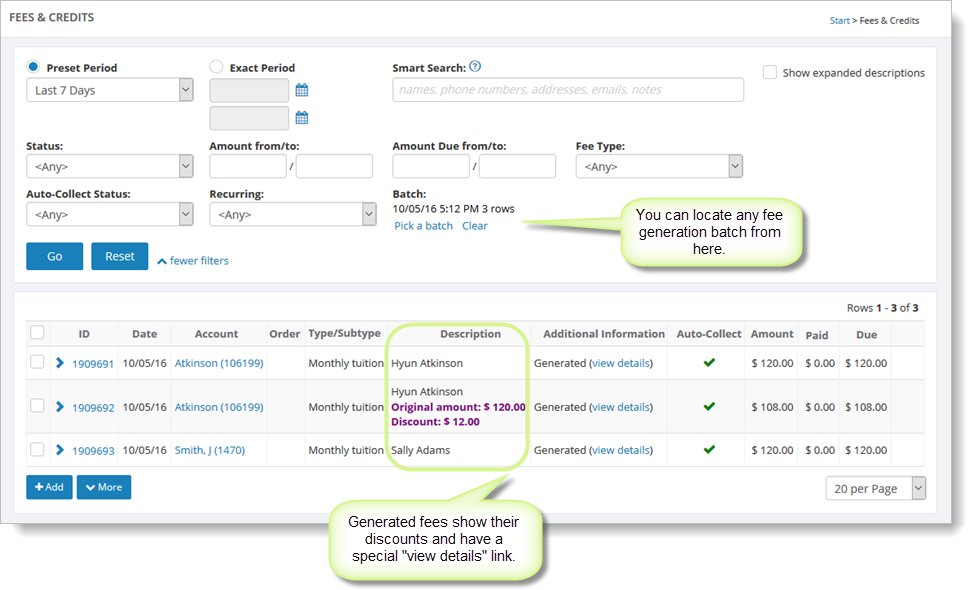
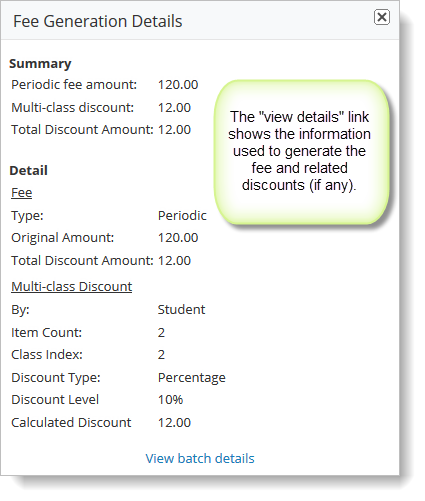
There is also a "view details" link for generated fees. Clicking on this link shows all of the information used to generated the fee and any related discounts.
