Managing Appointments
To view, add, edit or delete an appointment, go to Manage > Appointments > Appointments. Note that before working with appointments, you should have set up your
teachers' and locations' availability. For more information, see How to set up locations for appointments and How to set up teachers for appointments.
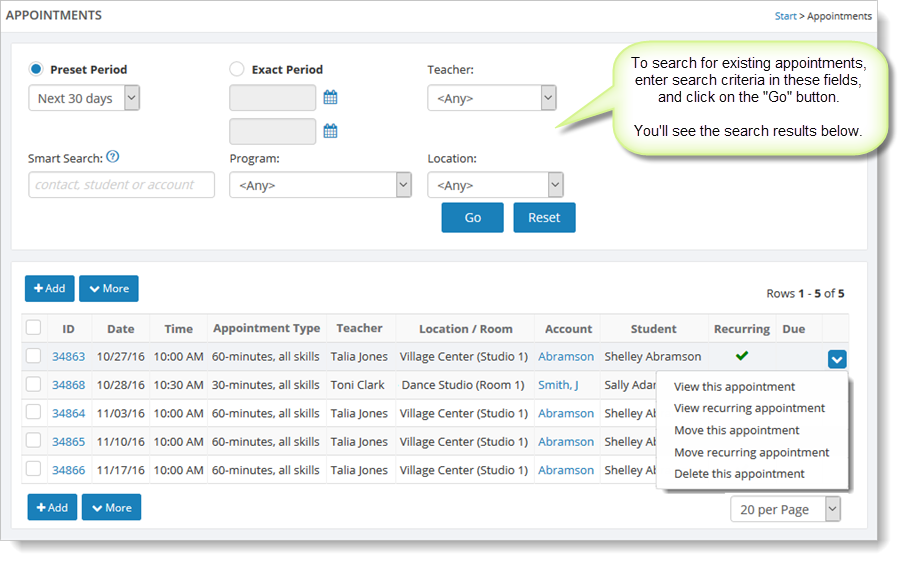
You can search for existing appointments by entering search criteria at the top of the page and clicking the "Go" button.
To work with an appointment, hover over it, and click on the far right blue down arrow. You will see a list of actions that are available for this appointment. (A recurring appointment has more available commands than a standalone appointment does.)
Adding an appointment
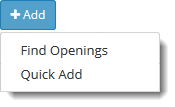
You can click on the "Add" button to create a new appointment with
either the "Quick Add" command or the "Find Openings" command.
For information on creating a new appointment, see Adding an appointment with Quick Add and Adding an appointment with Find Openings.
Canceling an appointment
To cancel an appointment, select the relevant appointment's
checkbox on the far left of the grid, and then click on the "More" button. Select "Cancel Selected Appointments."
Main Street Sites displays a message at the top of the page that lets you know the cancellation was successful. You'll notice that the text "canceled" appears in the "Appointment Type" column for the appointment.
If you want to undo this cancellation, select the same appointment, click on the "More" button, and select "Uncancel Selected Appointments."
Viewing and changing an appointment
Note: To view/change a recurring appointment, see Viewing and changing a recurring appointment.
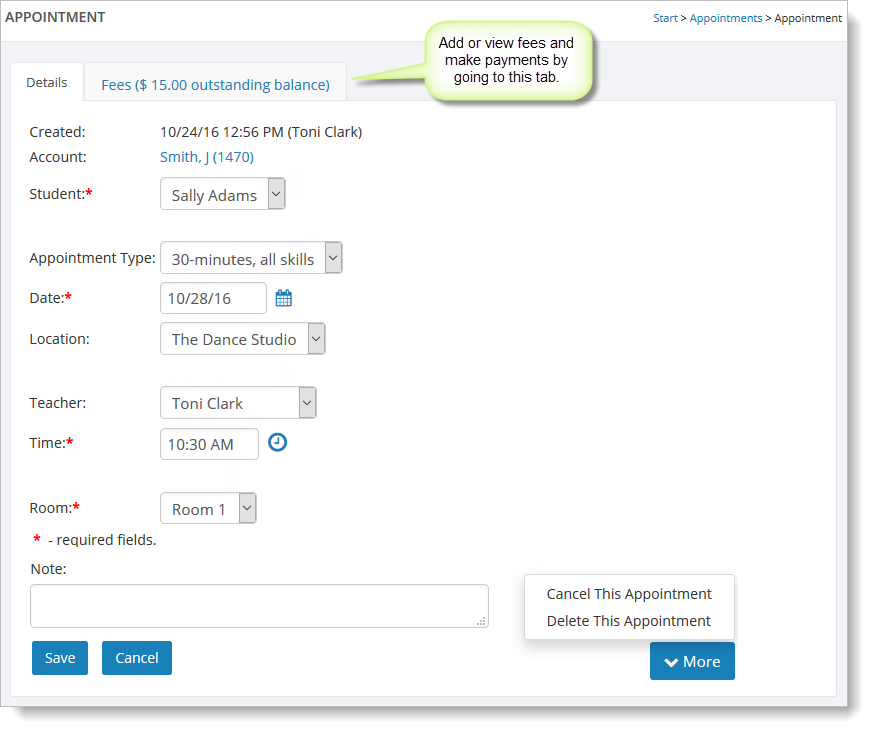
To view or change a standalone appointment, hover over the appointment you want to change, and click on the far right blue down arrow. Select "View this appointment."
From here you can change nearly anything about the appointment. If you need to change the time or date, but need to see future available slots, it's recommend you use the "Move this appointment" command (available from the appointments grid).
To cancel or delete the appointment from here, select the "More" button and choose the appropriate command.
Viewing and changing a recurring appointment
To view or change a recurring appointment, on the appointments grid, hover over the
appointment and click on the far right blue down
arrow. Select "View recurring appointment."
The "Pending Appointments" tab displays the remaining appointments that make up the recurring appointments. The "History" tab shows information for any appointments that have already taken place.
Note that if a fee is associated with this set of recurring appointments (as defined by the appointment type), the fee is referenced on the first of the recurring appointments. To view the fee, on the Details tab, select the link account name. This takes you to the account, where you can select the "Appointments" tab to view the fee.
Also on this page, you can select the "More" button to deactivate or delete this instance of the recurring appointments. Deactivating a recurring appointment prevents new appointments in its series from being generated.
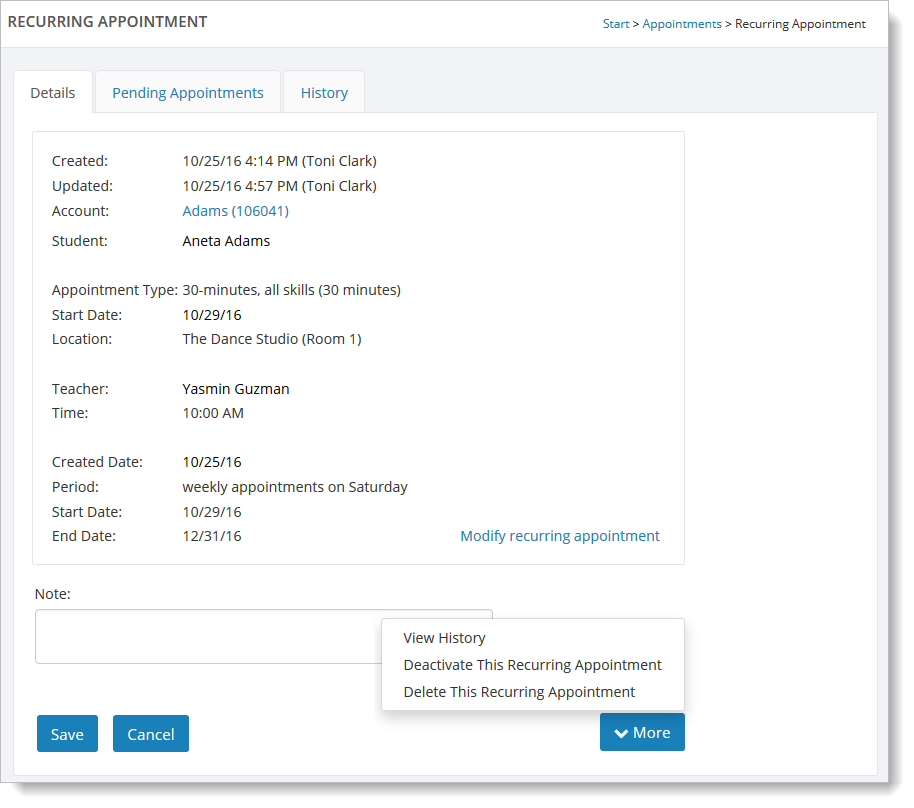
To make changes to the recurring appointment that is displayed on the page, select the "Modify recurring appointment" in the center of the page.
If you want to change a future appointment, go to the "Pending Appointments" tab, hover over the appointment on the grid, and click on the far right blue down arrow. Click on "Move this appointment."
Rescheduling an appointment
To move/reschedule an appointment, hover over it on the grid and select the far right blue down arrow. Select "Move this appointment."
You will see the Reschedule Appointment page.
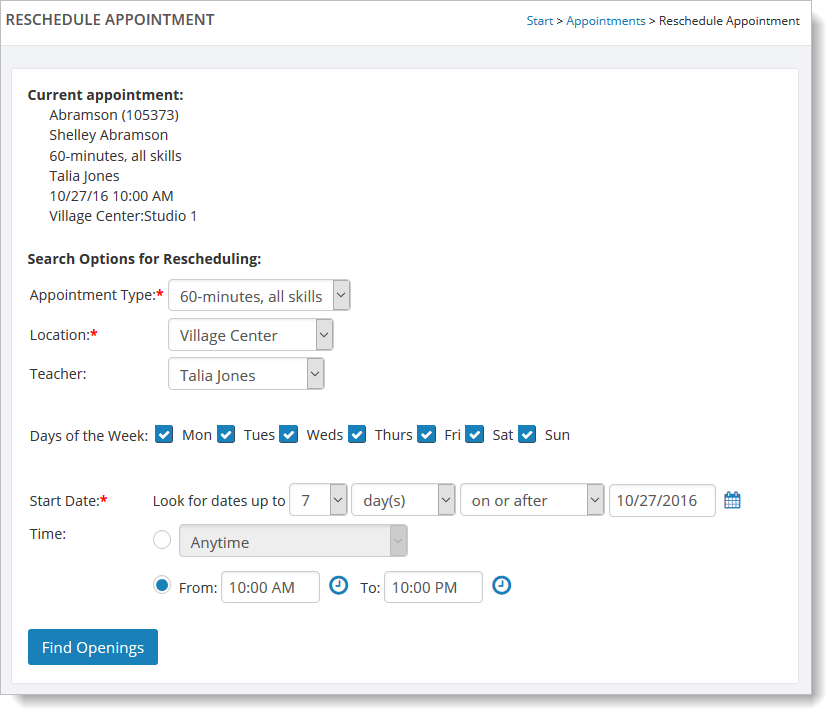
If necessary, make any changes in the appointment type, location or teacher.
For the "Days of the Week," leave checked of the days that are available for a reschedule.
You can also use the "Start Date" and "Time" fields to specify how far into the future and at what times you would like to reschedule the appointment.
Select the "Find Openings" button to see open appointment dates/times.
If Main Street Sites displays a message that there are no available appointment slots, you can widen your search criteria by selecting more days from "Days of the Week" or changing the "Start Date" and "Time" fields. If it's an option, you can also try changing the teacher and location.
If Main Street Sites is successful in finding available dates/time, you will see them displayed on the Calendar.
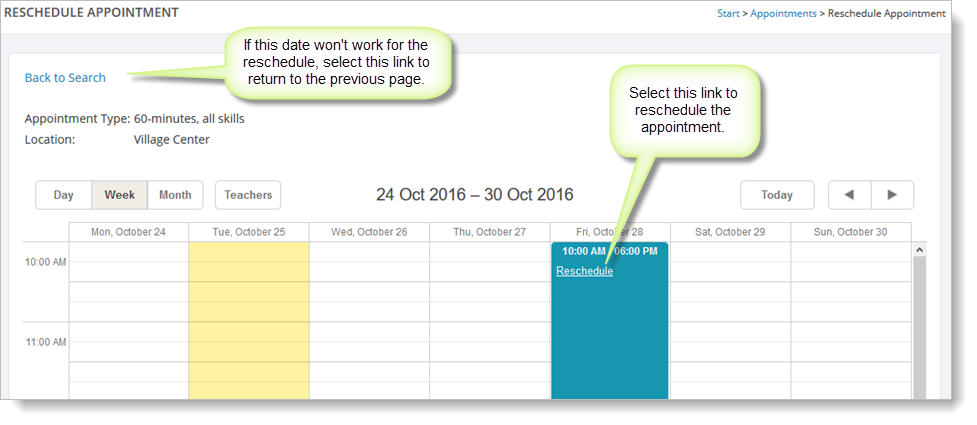
Click on the "Reschedule" link in the Calendar. Main Street Sites returns to the Reschedule Appointment page with the relevant appointment information filled out.
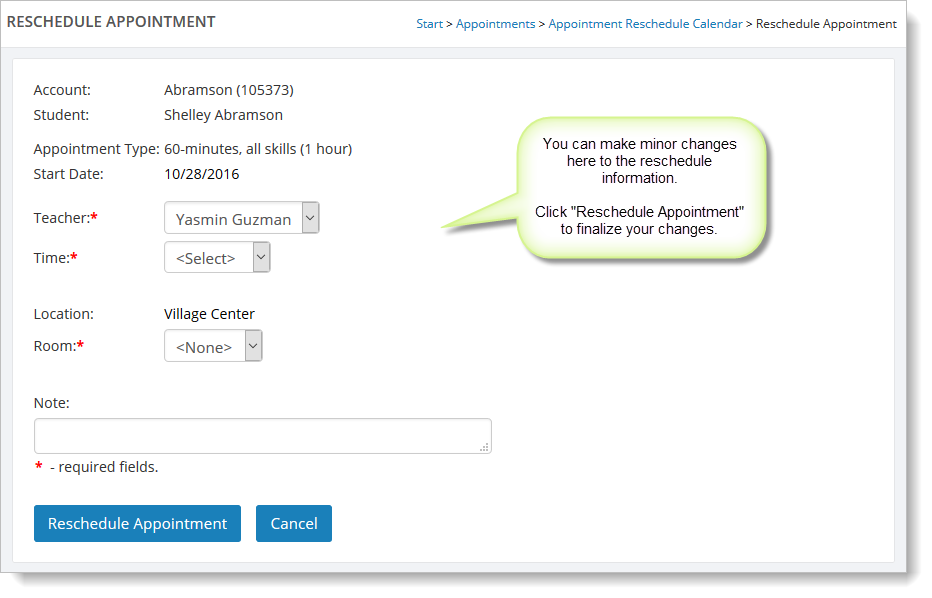
At this time, you can make changes or adjustments to the teacher, time, room (if appropriate) and notes. When you are ready, click on "Reschedule Appointment" to finalize the change.
Rescheduling a recurring appointment
To move/reschedule a recurring appointment, hover over it on the grid and
select the far right blue down arrow. Select "Move recurring appointment."
You will see a summary of the recurring appointment information. You also have the option here to select a different starting point from which to reschedule the recurring appointments.
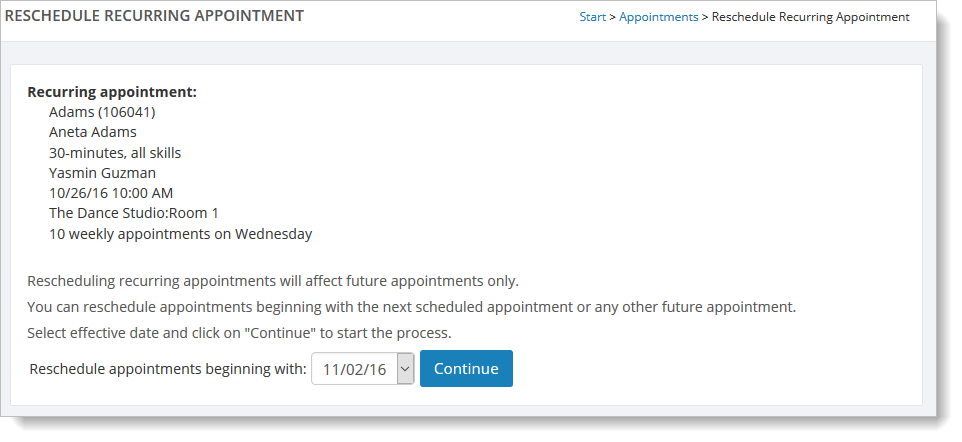
If necessary, make a different date selection. Click the "Continue" button.
You will see the Reschedule Recurring Appointment page. (This is very
similar to the Reschedule Appointment page, which is explained above.)
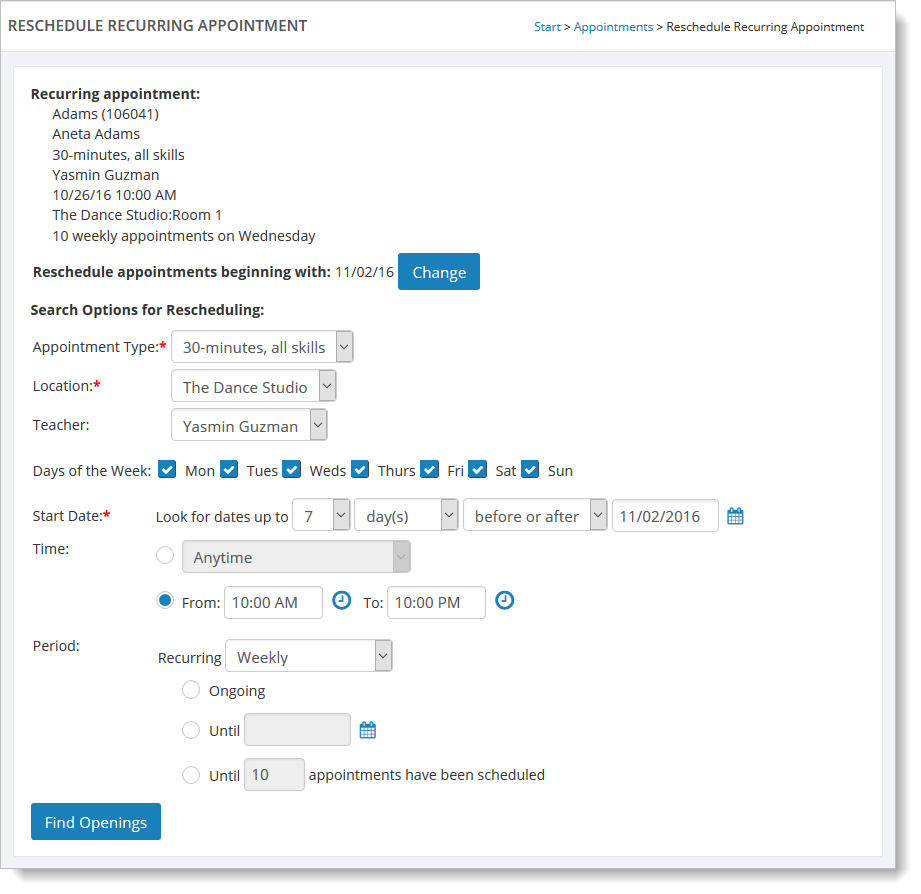
If necessary, make any changes on this page to widen or narrow the search criteria for a future appointment.
One area that is different for rescheduling recurring appointments is the Period section. Make sure you select an option in the "Recurring" field (if you want an option other than "Weekly") and select one of the three options below it:
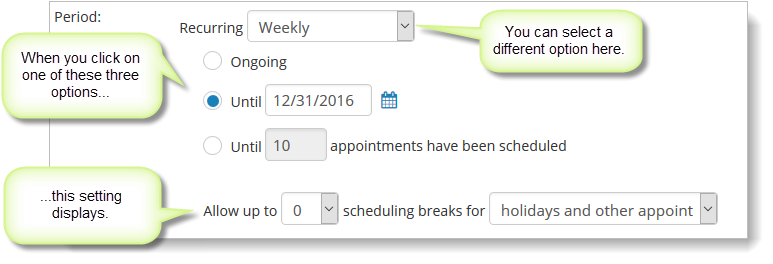
The "Allow up to X scheduling breaks" setting (which is slightly different for the "Ongoing" option) lets you decide how many times the system will skip a week when rescheduling due to holidays and other appointments.
When you are ready to see open appointment dates/times, click the "Find Openings" button.
If Main Street Sites displays a message that there are no available
appointment slots, you can widen your search criteria by selecting more
days from "Days of the Week" or changing the "Start Date" and "Time"
fields. If it's an option, you can also try changing the teacher and
location.
When Main Street Sites finds available dates/time, you will see them displayed on the Calendar.
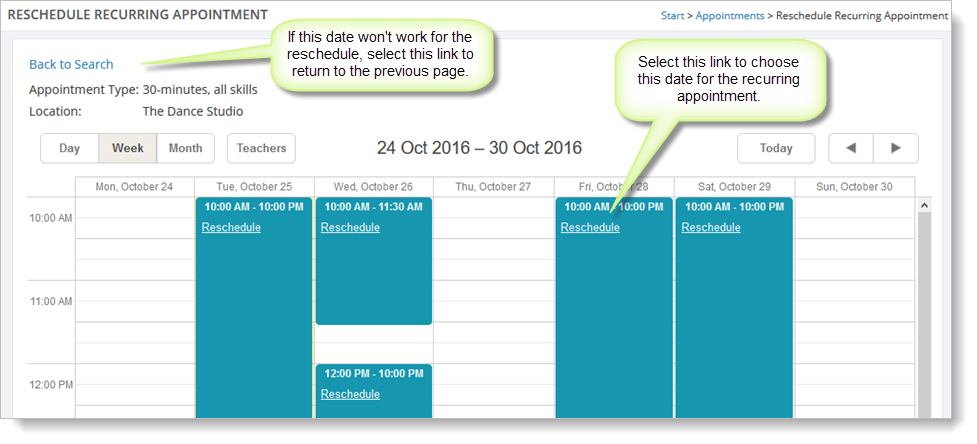
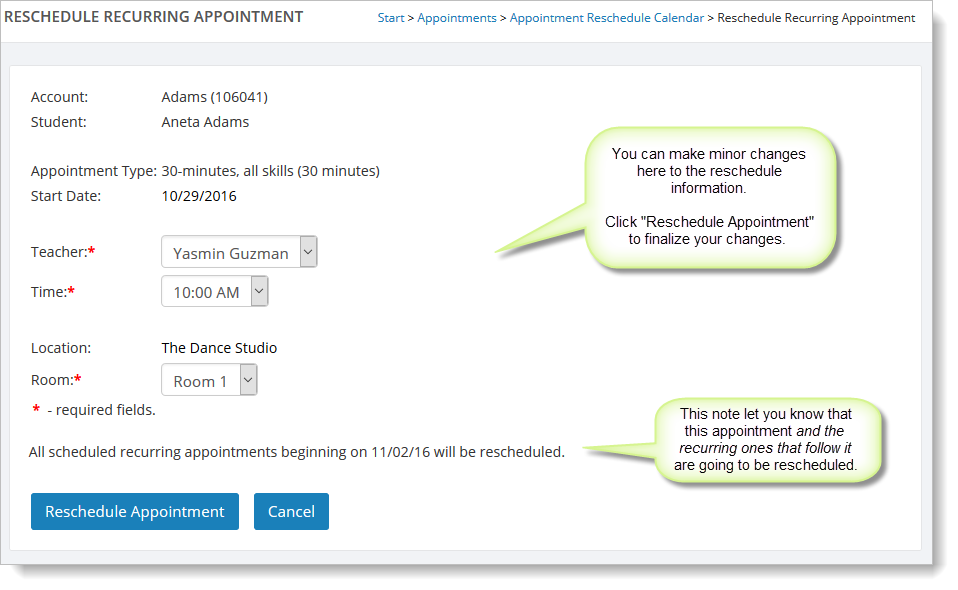
Click on the "Reschedule" link in the Calendar. Main Street Sites
returns to the Reschedule Recurring Appointment page with the relevant appointment
information filled out.
Review Resource Conflicts
You can check for scheduling problems with the "Resource Conflict Checking" command, which is available by selecting the "More" button on the main Appointments page.
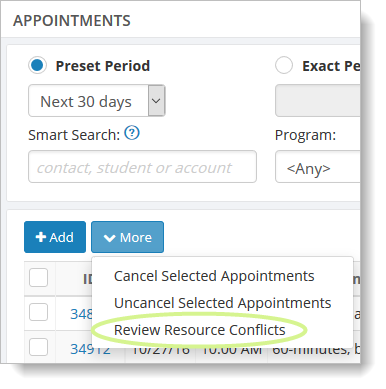
After selecting this command, you will either see a list of scheduling conflicts or the message "No resource conflicts were found." For more information, see Resource Conflict Checking.