Online Order Settings
Online registration can be a major aspect of your Main Street Site implementation. You can easily set up your class schedule and pricing, then let your customers register and pay for classes on your website. You can require payment or make it optional (or not use any upfront pricing). You can require your customers to login when they register, make logging in optional, or not use usernames and passwords for your customers at all.
If you'd like to learn more about Online Registration, please see the Online Registration Overview. If you'd like to get your account set up to use online registration for the first time, please also see How to Get Started with Online Registration.
Store orders can also be a big part of how you use your Main Street Sites account. See Store Overview for more information about the store feature. See How to Add the Store to your Website if you'd like to start using the store.
Settings for online orders can be edited by going to Setup > Settings > Online Order Settings.
Payment Gateway Settings
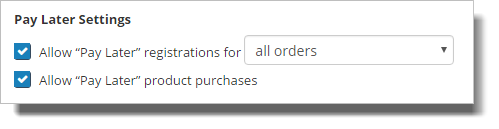
The "Allow 'Pay Later'..." options control whether or not your customers can choose to pay a registration amount later (as opposed to paying for their registrations upfront). There is a different Pay Later setting for online registration orders and store orders.
Online Order Mode
This setting is used to control whether or not your customers should login before they can place an order on your website. You can require your customers to login, make logging in optional, or remove the login feature entirely from your registration and store order pages.

Deposit and Installment Plans Templates
Main Street Sites has powerful installment plan and deposit-only features for online registration. Click on "Manage Deposit and Installment Plan Templates" to enable this feature for your account.
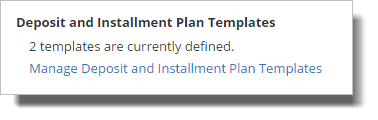
See the Installment Plans Overview for more information on deposit and installment plans and how to use them.
Terms and Conditions
This setting allows you to require customers to accept your terms and conditions on your registration page. If you select the first option, "Do not require...," your customers do not have to accept terms and conditions.
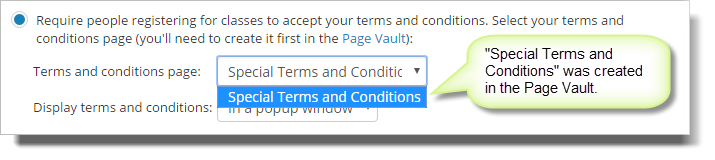
"Require people registering for classes to accept your terms and conditions"
This option requires you to create your terms and conditions in the Page Vault (Websites > Vaults > Page Vaults). After you have created and saved your terms and conditions, you can then select it here from the "Terms and conditions page" dropdown list. In this case the page vault page is called "Special Terms and Conditions," but it could be called anything you'd like to use.
This option also includes the ability to have the terms and conditions displayed either in a separate popup window or "inline" as part of the registration page.
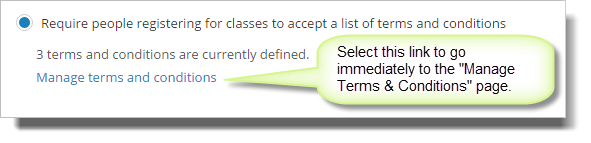
"Require people registering for classes to accept a list of terms and conditions"
This option requires you to create your terms and conditions on the "Manage Terms & Conditions" page. If this option is selected, the terms and conditions you create on "Manage Terms & Conditions" will be displayed to your customers at the bottom of the registration page. In the example below, you can see that three terms and conditions have been defined on the "Manage Terms & Conditions" page.
"How did your hear about us" Settings
Your registration page automatically has a "How did you hear about us" field on it. You can make that field required, and you can provide a fixed set of options for that field if you'd like to.

As you can see, in this case we have made the field required and added a few options to the list. We have also allowed customers to pick "Other" as an option. In that case a free text field will let them enter a different value.